Handbag Sample Approval: 7 Details to Photograph
A sample gets approved or rejected on about a dozen details, and most disputes trace back to one cause: nobody photographed those details under the same light, from the same angle, at the same moment. Fix the photo set before the first sample arrives and the approval conversation becomes short.
Build the photo set before the sample lands
The setup matters more than the camera. Hang a mid-grey sweep, put the camera on a tripod about 1.2 metres out at a 50 mm equivalent, and light from both sides at roughly 45 degrees with matched colour temperature. Skip the on-camera flash: it flattens stitch relief and blows out edge paint, the two details worth recording.
Put a 300 mm steel rule and a colour reference card in the bottom of every frame. Without the rule, a 5 mm gap at a rivet reads as nothing; without the colour card, a plating that shifted half a shade looks like a white balance error.
Shoot a fixed list every round: front, back, both sides, top, base, one three-quarter view and the interior, then add the crops below. Name files style-round-view-date so a pre-production shot can never be mistaken for a shipment shot. Repeat the setup for the pre-production and shipment samples, because an approval only holds if the next round is shot the same way. Every style in the handbags range is approved against this list.
Stitch density, backtack and both ends of a seam
Count stitches over 25 mm and multiply by 1.016 to get stitches per inch, and do it in three places: the gusset curve, the top edge, and the tab where the handle is anchored. Eight to ten per inch is the common band for PU and leather, dropping to six or seven on heavy canvas. Curves are where density drifts.
Then photograph the stress points. Handle roots, zip ends and pocket corners should carry a backtack, visible as a doubled run over 10 to 15 mm. A backtack that stops short leaves the seam free to run, and it is invisible in a full-bag photo.
Thread tails are the cheapest defect to catch and the easiest to miss. A buried tail disappears into the seam, a trimmed tail shows a stub no longer than 3 mm, and a loose tail hanging off the top edge is a rejection. On PU, also look for needle marks and puckering, since PU does not close up after the needle.

Edge paint, cut edges and hardware seating
Edge paint should wrap the cut edge and stop cleanly at the face, with no bleed onto the panel and no thin patch where the roller lifted. Two coats are normal. Photograph the edge under raking light, with the source almost parallel to the surface, because a flat fill hides the thin spots that crack in use.
Hardware is where a sample and a shipment diverge most often, and nearly always in plating colour rather than shape. Put the sample and the new piece in one frame under the same light and let the photo do the comparison. For a debossed logo, judge edge crispness and consistency of depth; a shallower strike that still reads sharp is acceptable, a strike with rounded edges is not.
Rivets should sit flat with no gap under the head and the post fully peened on the inside face. Photograph the inside as well as the outside, because a rivet that looks seated from the front can be sitting on the lining rather than through it. Zip pulls get their own crop.
Symmetry, panel alignment and pattern matching
Fold the bag along its centreline, place it on the sweep and shoot straight down. Any difference in left and right gusset height, handle drop or flap width is obvious in that frame. For sewn goods, 3 mm of panel misalignment is inside normal tolerance; 8 mm on a visible top edge is not.
On colour-block and printed styles the check moves to the seams: the pattern must meet across the zip and the gusset, and the repeat should not be cut mid-motif on a front panel. Shoot each seam square on with the rule alongside.
Interior, lining and the parts a photo set usually skips
The interior is where cost gets cut quietly. Lining seams should be bound or overlocked rather than left raw, and the allowance should not show through an open pocket. Shoot it twice: straight down with the bag propped open, and at 45 degrees so pocket depth and zip ends show in profile.
Check pocket depth against the spec with the rule in frame, check that interior zip ends are turned and stitched, and check the logo label: position, stitch line, woven or printed. A printed label on a style approved with a woven one is a change of specification.
Weight, colour under two lights and the sign-off sheet
Weigh the sample to the nearest gram, then weigh the packed carton and note its dimensions so volume weight can be calculated before booking freight. A sample that gained 40 grams between rounds usually means a lining substitution.
Photograph colour twice, once near 6500 K and once near 3000 K. PU and coated fabric shift more between those two conditions than between two dye lots, so a single-light photo proves little. Record the dye lot on the sheet.
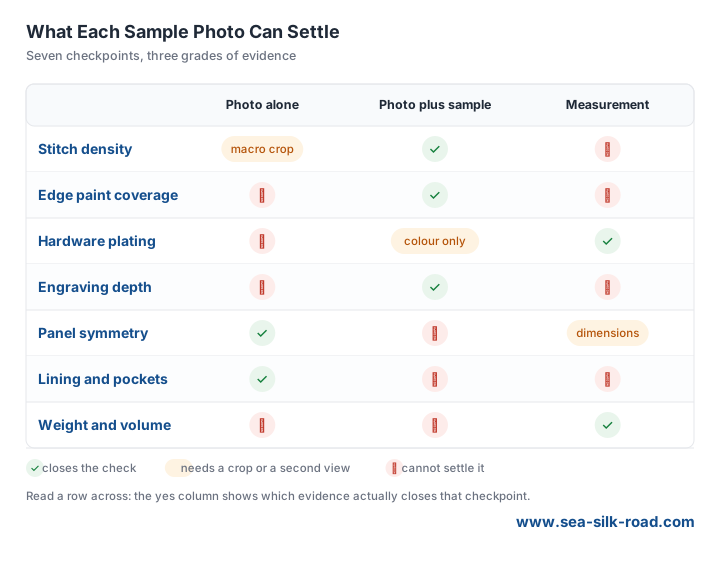
Close with a one-page sign-off: seven rows, each with a photo reference, a verdict of pass, rework or reject, initials and a date. Sign the sealed reference sample across the seam, bag it with the round number, and store it where production can reach it. That sheet is what turns an approval into something a factory can be held to weeks later.
Planning a promotional gift order?
Send your spec and target quantity for a quote and a digital proof.
Get a free quote


