How to Inspect Handbag Stitching on a Sample: 6 Failure Points
Look at the handle root before you look at anything else. That seam carries the whole load of a full bag, and it is the first place a factory's real stitch quality shows: machine tension, whether the operator reversed at the end, whether the needle was changed before it started cutting the material. A sample can look clean across the body panel and still fail here within a week of retail use.
Stitching inspection is a measurement job, not an opinion. Six points decide whether a sample passes, and each one has a number attached that you can read with a ruler, a magnifier and a 10 kg weight. What follows is the order they fail in and how to check each one in under fifteen minutes per bag.
Read stitch density over 25 mm, not over the whole seam
Stitch density is stitches per inch, and for handbag body seams most workshops run 7 to 9. Below 7 the seam is a row of widely spaced holes that opens under load; above 10 the needle perforates the material faster than the thread fills it, which is how leather seams tear along the stitch line rather than across it. Topstitching usually runs one step denser because it is decorative and visible.
Do not count the whole seam. Lay a ruler along it, mark a 25 mm span, and count the stitch holes inside: 8 at 8 stitches per inch, 7 at the low end of spec, 10 at the high end. Count three spans — handle root, mid-panel, bottom corner — because density drifts as a machine runs, and the drift is rarely uniform. A sample that reads 9, 9, 6 has a machine problem at the end of a run, not a specification problem.
Six points that fail, in the order they fail
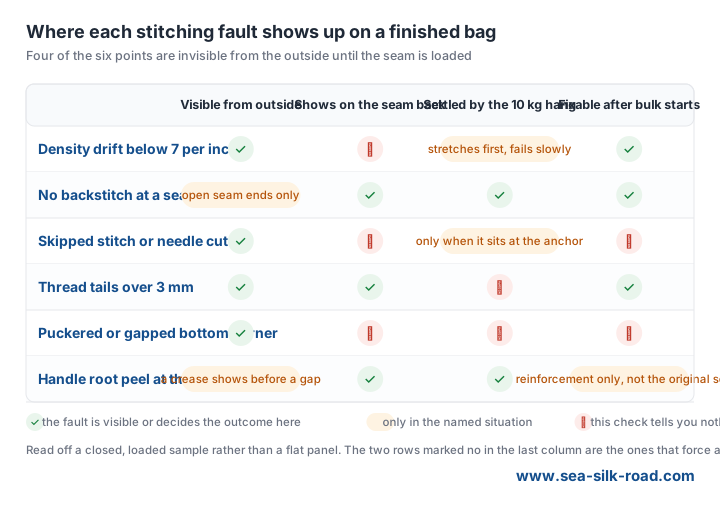
Stitch density drift shows first, and it is the easiest to miss because a single seam looks fine. Measure three spans as above.
Missing backstitch is second. Every seam end needs two to three reverse stitches, and the reverse must land in the same holes, not beside them. Pull the seam ends apart with both thumbs; if the thread runs out at the edge without a lock, the seam will unravel from that end outward. Check both ends of every load-bearing seam, and check the inside of the bag where the lining hides the reverse.
Skipped stitches and needle cuts come third. A skipped stitch is a gap in the interlock; a needle cut is a small slit in the material beside the hole. Hold the seam against a light and look for a bright point where the thread should be. One skipped stitch in a 300 mm run is a re-stitch; two or more in a row is a machine timing problem, and a needle cut anywhere on a PU or coated fabric is a reject, because the slit propagates once the material flexes.
Untrimmed thread tails are fourth and are pure housekeeping. Tails longer than about 3 mm will pull through the seam in use and leave a loose end on the outside. Look inside the bag, at the pocket edges and at the zipper ends, which are the three places trimmers skip.
Bottom corner pucker or gap is fifth. A boxed corner that puckers means the sewer stretched one panel against the other; a corner with a visible gap means the seam allowance was trimmed before the second pass. Neither is repairable without re-cutting, so this is the point that decides whether the whole sample is re-made.
Handle root failure is last because it only appears under load. The anchor should combine a bar-tack or box-X with the seam itself, spreading the peel load over 12 to 16 mm rather than concentrating it on one row of stitches.
Test the seam under load, not under a lamp
A lamp shows you the outside of a seam; a weight shows you the inside. Fill the sample to its stated capacity, hang it from both handles on a single hook so the base carries nothing, and leave it 24 hours. Measure top edge to the centre of the base seam at the start and at the end.
Under 3 mm of growth is a bag holding its geometry. Around 10 mm means the anchor stitching is stretching and will keep stretching; the thread is stronger than the material around it, and the holes are enlarging. Also run a 5 kg single-handle pull for thirty seconds and watch the handle root: any visible opening of the stitch holes, any whitening of a dark PU at the anchor, is a fail even if the seam holds.

Thread and needle choice sets the ceiling on all six checks
You cannot inspect your way out of the wrong consumables. Bonded nylon or polyester thread in the Tex 60 to Tex 90 range suits handbag body seams; a lighter thread in a heavy seam reads as dense stitching while filling half the hole. The needle must match the material: leather points cut a slit that closes around the thread, while a round point on coated PU leaves a hole that stays open and lifts the coating.
Seam allowance belongs on the same sheet: eight to ten millimetres for a bag body. Below that the seam has nothing left when it is trimmed; above it the corner cannot be turned cleanly. Measure it at the same three spans where you counted stitches.
Write six numbers onto the inspection sheet
An inspection that produces a paragraph of adjectives gives the factory nothing to fail against. Six numbers do: stitches per inch at three spans, backstitch count at each seam end, skipped-stitch count per 300 mm, longest thread tail, seam allowance in millimetres, and millimetres of growth after the 24-hour hang.
Photograph the handle root and the bottom corner of the approved sample at the same distance and light each time, tag the photos with the date, and compare each bulk delivery against them rather than against memory. Two of the six points cannot be fixed after cutting, so the sample is the only cheap moment. Browse the handbags category to see which constructions the current range uses, then ask for the stitch count on your style before the sample is sewn.
Planning a promotional gift order?
Send your spec and target quantity for a quote and a digital proof.
Get a free quote


